The experiment involves using an IR (Infrared) remote control to send signals to a Raspberry Pi Pico microcontroller. By decoding the signals received from the IR remote, the microcontroller can identify which button was pressed. This project demonstrates the practical applications of IR communication in embedded systems, enabling the control of devices wirelessly.
Scope:
The scope of this experiment includes setting up the hardware connections between the IR transmitter/receiver and the Raspberry Pi Pico, configuring the microcontroller to read IR signals via UART, and implementing both MicroPython and embedded C code to decode and display the signals. This experiment can be extended to control various electronic devices like TVs, lights, or fans using a remote control.
Prerequisite:
3.1. Hardware:
Pico microcontroller
IR remote control
IR receiver
Breadboard
Jumper wires
USB cable (to connect the computer)
3 .2. Software:
Thonny Software(For micro python)
MicroPython firmware installed on Raspberry Pi Pico
ubuntu Terminal(For embedded C)
CMake,Pico SDK,GNU Arm Embedded Toolchain,WSL.
Connection Details:
IR Receiver Connection:
Connect the VCC pin of the IR receiver to the 3.3V pin on the Pico.
Connect the GND pin to the GND pin on the Pico.
Connect the OUT pin of the IR receiver to the UART RX pin (e.g., GPIO 5) on the Pico.
Power Supply: Ensure the Pico is powered via USB or an external power source.

Working Principle:
The IR remote control transmits signals modulated at specific frequencies when buttons are pressed. The IR receiver captures these signals and converts them into electrical signals. The Raspberry Pi Pico, configured with UART communication, reads these signals as digital data. The program running on the Pico decodes this data to determine which button was pressed on the remote.
Infrared-Receiver
IR Receiver Module

S: Signal output
+:VCC
-: GND
An infrared-receiver is a component which receives infrared signals and can independently receive infrared rays and output signals compatible with TTL level. It is similar with a normal plastic-packaged transistor in size and is suitable for all kinds of infrared remote control and infrared transmission.
Infrared, or IR, communication is a popular, low-cost, easy-to-use wireless communication technology. Infrared light has a slightly longer wavelength than visible light, so it is imperceptible to the human eye - ideal for wireless communication. A common modulation scheme for infrared communication is 38KHz modulation.
Adopted HX1838 IR Receiver Sensor, high sensitivity
Can be used for remote control
Power Supply: 3.3~5V
Interface: Digital
Modulate Frequency: 38Khz
Remote Control
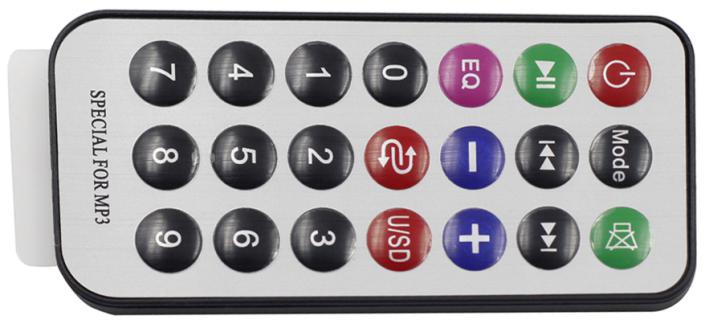
This is a Mini thin infrared wireless remote control with 21 function buttons and a transmitting distance of up to 8 meters, which is suitable for operating a wide range of devices in a kid’s room.
Size: 85x39x6mm
Remote control range: 8-10m
Battery: 3V button type lithium manganese battery
Infrared carrier frequency: 38KHz
Surface paste material: 0.125mm PET
Effective life: more than 20,000 times
Application code:
MicroPython:
import time
from machine import Pin, freq
from ir_rx.print_error import print_error
from ir_rx.nec import NEC_8
pin_ir = Pin(5, Pin.IN)
def decodeKeyValue(data):
if data == 0x16:
return "*"
if data == 0x0C:
return "1"
if data == 0x18:
return "CHANNEL UP"
if data == 0x5E:
return "3"
if data == 0x08:
return "VOLUME DOWN"
if data == 0x1C:
return "OK"
if data == 0x5A:
return "VOLUME UP"
if data == 0x42:
return "7"
if data == 0x52:
return "CHANNEL DOWN"
if data == 0x4A:
return "9"
if data == 0x09:
return "9"
if data == 0x15:
return "8"
if data == 0x7:
return "7"
if data == 0x0D:
return "#"
if data == 0x19:
return "0"
if data == 0x44:
return "4"
if data == 0x43:
return "6"
if data == 0x40:
return "5"
if data == 0x45:
return "1"
if data == 0x47:
return "3"
if data == 0x46:
return "2"
return "ERROR"
# User callback
def callback(data, addr, ctrl):
if data < 0: # NEC protocol sends repeat codes.
pass
else:
print(decodeKeyValue(data))
ir = NEC_8(pin_ir, callback) # Instantiate receiver
ir.error_function(print_error) # Show debug information
try:
while True:
pass
except KeyboardInterrupt:
ir.close()
Embedded C:
#include "pico/stdlib.h"
#include <stdio.h>
#define IR_PIN 5 // IR receiver connected to GPIO 5
// NEC protocol constants
#define NEC_HDR_MARK 9000
#define NEC_HDR_SPACE 4500
#define NEC_BIT_MARK 560
#define NEC_ONE_SPACE 1690
#define NEC_ZERO_SPACE 560
#define NEC_RPT_SPACE 2250
#define NEC_BITS 32
volatile uint32_t ir_value = 0; // Variable to store decoded IR value
void decode_nec_signal() {
uint32_t time, last_time = 0;
uint8_t bits_count = 0;
uint32_t command = 0;
// Wait for the header pulse (9ms high + 4.5ms low)
while (gpio_get(IR_PIN) == 1); // Wait for the signal to go LOW (header)
sleep_us(NEC_HDR_MARK); // Delay for the header mark duration
time = to_us_since_boot(get_absolute_time());
if (time - last_time >= NEC_HDR_MARK) {
last_time = time;
// Read 32 bits of data
for (int i = 0; i < NEC_BITS; i++) {
// Wait for the start of the bit pulse (560us)
while (gpio_get(IR_PIN) == 1);
sleep_us(NEC_BIT_MARK);
// Measure the space duration to determine if it's a '0' or '1'
while (gpio_get(IR_PIN) == 0); // Wait for space
time = to_us_since_boot(get_absolute_time());
if (time - last_time > NEC_ONE_SPACE) {
// Bit is 1
command = (command << 1) | 1;
} else {
// Bit is 0
command = (command << 1) | 0;
}
last_time = time;
}
}
ir_value = command;
}
// Function to map IR codes to corresponding button values
const char* decodeKeyValue(uint32_t data) {
switch (data) {
case 0x16: return "*";
case 0x0C: return "1";
case 0x18: return "CHANNEL UP";
case 0x5E: return "3";
case 0x08: return "VOLUME DOWN";
case 0x1C: return "OK";
case 0x5A: return "VOLUME UP";
case 0x42: return "7";
case 0x52: return "CHANNEL DOWN";
case 0x4A: return "9";
case 0x09: return "9";
case 0x15: return "8";
case 0x07: return "7";
case 0x0D: return "#";
case 0x19: return "0";
case 0x44: return "4";
case 0x43: return "6";
case 0x40: return "5";
case 0x45: return "1";
case 0x47: return "3";
case 0x46: return "2";
default: return "ERROR";
}
}
int main() {
// Initialize the UART for printing messages to the console
stdio_init_all();
// Initialize the GPIO pin for the IR receiver
gpio_init(IR_PIN);
gpio_set_dir(IR_PIN, GPIO_IN); // Set as input
while (true) {
decode_nec_signal(); // Decode the signal from the IR receiver
if (ir_value != 0) {
// Print the decoded button value
printf("Button Pressed: %s\n", decodeKeyValue(ir_value));
// Reset the ir_value to avoid duplicate prints
ir_value = 0;
}
sleep_ms(100); // Small delay to avoid spamming the console
}
return 0;
}
Hardware Image:

Output:
When the experiment is conducted, pressing buttons on the IR remote will display corresponding messages on the serial terminal indicating which button was pressed.
Video Demonstration:
Appendix:
Common CMakeLists:
cmake_minimum_required(VERSION 3.12)
# Pull in SDK (must be before project)
include(pico_sdk_import.cmake)
project(pico_experiments C CXX ASM)
set(CMAKE_C_STANDARD 11)
set(CMAKE_CXX_STANDARD 17)
if (PICO_SDK_VERSION_STRING VERSION_LESS "1.3.0")
message(FATAL_ERROR "Raspberry Pi Pico SDK version 1.3.0 (or later) required. Your version is ${PICO_SDK_VERSION_STRING}")
endif()
# Initialize the SDK
pico_sdk_init()
add_compile_options(-Wall
-Wno-format # int != int32_t as far as the compiler is concerned because gcc has int32_t as long int
-Wno-unused-function # we have some for the docs that arent called
)
if (CMAKE_C_COMPILER_ID STREQUAL "GNU")
add_compile_options(-Wno-maybe-uninitialized)
endif()
# Hardware-specific examples in subdirectories:
add_subdirectory(expt_10_LCD)
CMakeLists:
cmake_minimum_required(VERSION 3.12)
# Set project name
project(nec_ir_decoder_project)
# Specify the Pico SDK path
set(PICO_SDK_PATH "/path/to/pico-sdk")
# Initialize the Pico SDK
include(pico_sdk_import.cmake)
# Define executable
add_executable(nec_ir_decoder
main.c
)
# Link Pico SDK to the project
target_link_libraries(nec_ir_decoder pico_stdlib)
# Enable USB output (UART also available)
pico_enable_stdio_usb(nec_ir_decoder 1)
pico_enable_stdio_uart(nec_ir_decoder 1)
# Create map/bin/hex/uf2 files
pico_add_extra_outputs(nec_ir_decoder)
References:
| # | Topic | Date & time | Action |
|---|
0% Completed (0/1)