Introduction:
In this experiment, a sound sensor module is interfaced with a Raspberry Pi Pico microcontroller to detect sound levels and display the data in the serial console. Additionally, an LED will glow when the sound level exceeds a predefined threshold. This experiment demonstrates the usage of analog sensors with microcontrollers and how to convert raw ADC values into useful data.
Scope:
The experiment helps in understanding how to:
Interface analog sensors with a microcontroller.
Convert analog signals into digital values using an ADC (Analog-to-Digital Converter).
Control an output device (LED) based on sensor data.
Write application code in both MicroPython and C for Pico microcontroller.
Prerequisite:
3.1. Hardware:
Pico microcontroller
Sound sensor module
LED
Resistor (220 ohm)
Breadboard
Jumper wires
USB cable (to connect the computer)
3 .2. Software:
Thonny Software(For micro python)
MicroPython firmware installed on Raspberry Pi Pico
ubuntu Terminal(For embedded C)
CMake,Pico SDK,GNU Arm Embedded Toolchain,WSL.
Connection Details:
Sound Sensor Module:
VCC → 3.3V on Pico
GND → GND on Pico
Analog Output Pin → ADC0 (GPIO 26) on Pico
LED:
Anode → GPIO 25 on Pico
Cathode → GND (through a 220-ohm resistor)
UART Serial Console: Use a micro-USB cable to connect the Pico to the PC, then open PuTTY and select the correct COM port and baud rate (115200).
Working Principle:
The sound sensor module detects ambient sound using a microphone and outputs an analog voltage corresponding to the sound intensity. This voltage is read by the ADC on the Pico, which converts it into a digital value. The LED lights up when the sound level exceeds a set threshold.
The potentiometer on the sensor module adjusts the sensitivity, determining the minimum sound level that will trigger a detection
Basically, Sound is a waveform of energy which is produced by the form of mechanical vibration. The type of sound determines its frequency. For example, a bass drum has a low-frequency sound and a cymbal has a higher frequency sound. The sound sensor is a simple device which can detect the sound. The sound sensors are very simple to use.
Pin Configuration and Components
The sound sensor consist of Microphone as a transducer, potentionmeter to adjust the intensity, LM386 low power audio amlifier, LED and other passive components like resistors and capacitors.
You can set a threshold value using a potentiometer so that when the amplitude of the sound exceeds the threshold value, the module will output LOW otherwise HIGH.
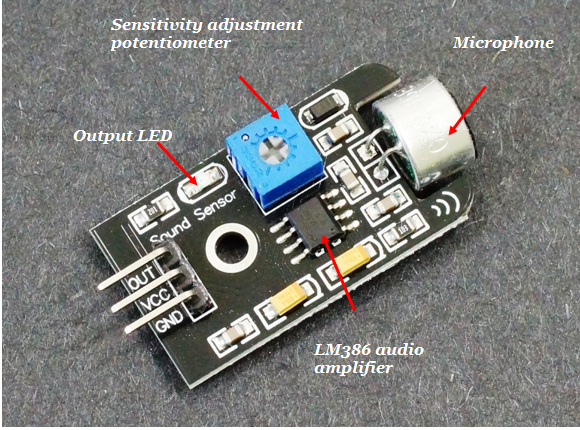
This sensor includes 3 pins and they are,
Pin1 (VCC): 3.3V DC to 5V DC
Pin2 (GND): This is aground pin
Pin3 (OUT): This is an output pin. It provides high signal when there is no sound and goes LOW when sound is detected. You can connect it to any digital pin on an Arduino or directly to a 5V relay or similar device.
Working Principle of Sound Sensor
It works similar to our ears. Our Ears have a diaphragm which converts the detected the vibration and converts it in the signal. Similarly, the sound sensors convert the vibration into audio signal (voltage and current proportional) with the help of a microphone.
This microphone has an inbuilt diaphragm, made up of magnets which are coiled by metal wire. Whenever sound waves hits the diaphragm, magnets vibrate and at the same time coil induces the current.
Application code:
MicroPython:
import machine
import time
# Set up ADC on GPIO 26 (Analog input) and LED on GPIO 25 (Digital output)
adc = machine.ADC(26)
led = machine.Pin(25, machine.Pin.OUT)
sound_threshold = 1.5 # Set sound threshold in volts
while True:
# Read the raw ADC value (0-65535 for 16-bit resolution)
raw_value = adc.read_u16()
# Convert the ADC reading to voltage (assuming a 3.3V reference)
voltage = raw_value * 3.3 / 65535
print("Sound level (Voltage): {:.2f} V".format(voltage)) # Display sound level in serial console
if voltage > sound_threshold:
led.on() # Turn LED on if sound level exceeds threshold
else:
led.off() # Turn LED off if sound level is below threshold
time.sleep(0.5) # Adjust sampling rate
Embedded C:
#include <stdio.h>
#include "pico/stdlib.h"
#include "hardware/adc.h"
#define SOUND_SENSOR_PIN 26 // GPIO pin for ADC input
#define LED_PIN 25 // GPIO pin for LED
int main() {
stdio_init_all();
// Initialize ADC and LED
adc_init();
adc_gpio_init(SOUND_SENSOR_PIN); // Initialize the selected ADC pin
adc_select_input(0); // Select ADC channel (0 corresponds to GPIO 26)
gpio_init(LED_PIN); // Initialize LED pin
gpio_set_dir(LED_PIN, GPIO_OUT); // Set LED pin as output
float sound_threshold = 1.5; // Set sound threshold in volts
while (true) {
uint16_t raw_value = adc_read(); // Read raw ADC value (0-4095 for 12-bit ADC)
float voltage = raw_value * 3.3f / 4095.0f; // Convert raw ADC to voltage
printf("Sound level (Voltage): %.2f V\n", voltage); // Display sound level in serial console
if (voltage > sound_threshold) {
gpio_put(LED_PIN, 1); // Turn LED on if sound level exceeds threshold
} else {
gpio_put(LED_PIN, 0); // Turn LED off if sound level is below threshold
}
sleep_ms(500); // Adjust sampling rate
}
return 0;
}
Hardware Image:

Output:
The sound level in volts is displayed in the serial console. When the sound exceeds the set threshold (e.g., 1.5V), the LED will light up.
Video Demonstration:
Appendix:
Common CMakeLists:
cmake_minimum_required(VERSION 3.12)
# Pull in SDK (must be before project)
include(pico_sdk_import.cmake)
project(pico_experiments C CXX ASM)
set(CMAKE_C_STANDARD 11)
set(CMAKE_CXX_STANDARD 17)
if (PICO_SDK_VERSION_STRING VERSION_LESS "1.3.0")
message(FATAL_ERROR "Raspberry Pi Pico SDK version 1.3.0 (or later) required. Your version is ${PICO_SDK_VERSION_STRING}")
endif()
# Initialize the SDK
pico_sdk_init()
add_compile_options(-Wall
-Wno-format # int != int32_t as far as the compiler is concerned because gcc has int32_t as long int
-Wno-unused-function # we have some for the docs that arent called
)
if (CMAKE_C_COMPILER_ID STREQUAL "GNU")
add_compile_options(-Wno-maybe-uninitialized)
endif()
# Hardware-specific examples in subdirectories:
add_subdirectory(expt_10_LCD)
CMakeLists:
# Set minimum CMake version
cmake_minimum_required(VERSION 3.13)
# Set project name
project(sound_sensor_project C CXX ASM)
# Enable Pico SDK
include(pico_sdk_import.cmake)
# Initialize the Pico SDK
pico_sdk_init()
# Add executable
add_executable(sound_sensor
sound_sensor.c
)
# Link libraries
target_link_libraries(sound_sensor pico_stdlib hardware_adc)
# Create output files
pico_add_extra_outputs(sound_sensor)
References:
| # | Topic | Date & time | Action |
|---|
0% Completed (0/1)